# SinGAN-tensorflow2.0
**Repository Path**: showtimejmj/SinGAN-tensorflow2.0
## Basic Information
- **Project Name**: SinGAN-tensorflow2.0
- **Description**: simple implementation of SinGAN on tensorflow2.0
- **Primary Language**: Unknown
- **License**: Not specified
- **Default Branch**: master
- **Homepage**: None
- **GVP Project**: No
## Statistics
- **Stars**: 0
- **Forks**: 0
- **Created**: 2020-04-02
- **Last Updated**: 2020-12-19
## Categories & Tags
**Categories**: Uncategorized
**Tags**: None
## README
# ◆ SinGAN : Learning a Generative Model from a Single Natural Image
[paper url] : https://arxiv.org/abs/1905.01164
[supplementary materials] : https://drive.google.com/file/d/1wYEsG-y4Ruk0GpNs_KyQa8e3xM38bNRq/view
[youtube] : https://www.youtube.com/watch?v=xk8bWLZk4DU
[Implementation (tf2.0)] : https://oss.navercorp.com/dohyun-kim9404/SinGAN-tensorflow2.0
## Introduction
* ##### Contribution
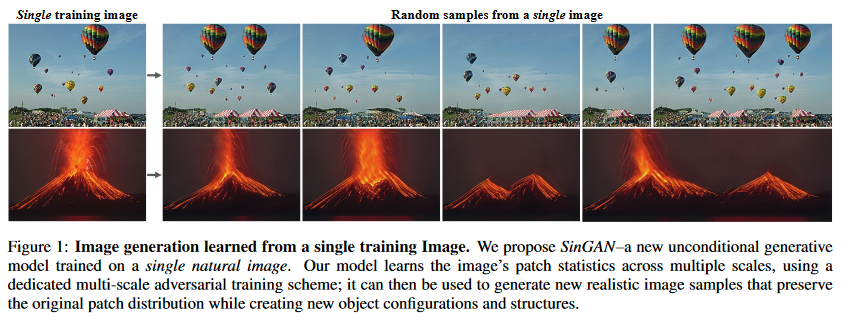
* **한 장의 이미지**로부터 새로운 이미지를 생성하는 방법 제시
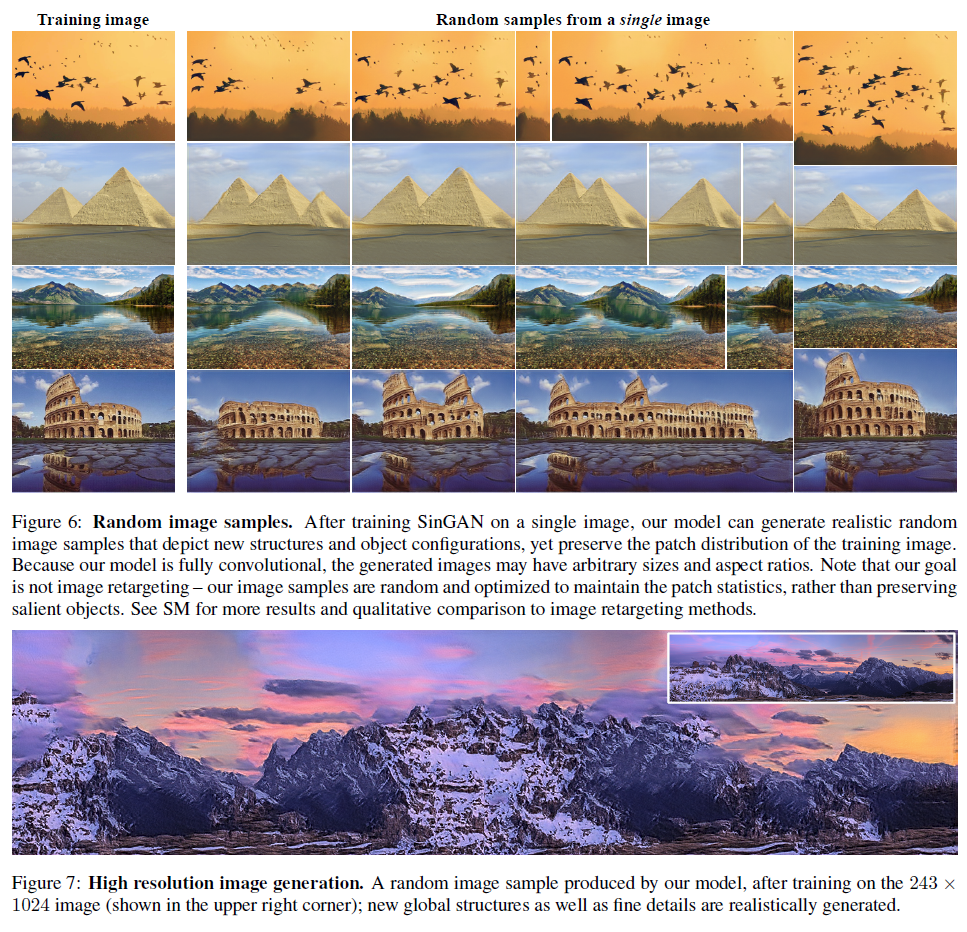
* Fully convolutional network로 구성하여 **이미지 사이즈에대한 제약 없음**
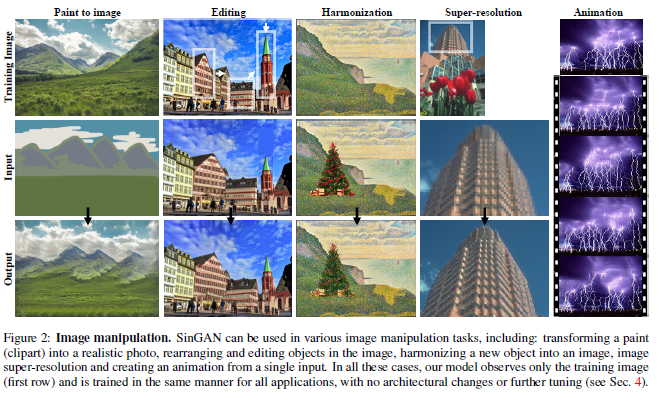
* 학습된 모델을 super-resolution, paint-to-image, harmonization, editing, single image animation task에 응용가능
* ##### Limitation
* 학습시간이 오래걸림 (장당 30분), 이미지에 대한 일반성 없음
* 이미지 내부의 통계적 특성을 사용하기 때문에 **의미적 다양성**을 학습하기 힘듦
* 예를들어 한마리의 강아지만 등장하는 이미지를 통해서는 여러 종의 강아지를 생성할 수 없음
## Method
### 1. Multi-scale architecture
* Scale factor
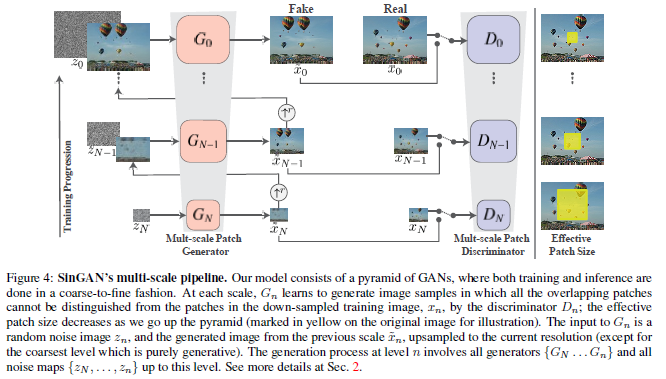
* 단계별로 3/4정도 차이
* 8단계
* 가장 작은 단계에서 짧은 축 25필셀정도 되도록 설정 (따라서 가장 큰 단계에서 짧은축 250픽셀 정도로 resize)
* Receptive field
* 3*3 size로 5번 convolution => 유효 receptive field 사이즈 11
* 가장 작은 단계 (N=8) 에서는 전체 이미지의 절반정도 영역을 커버
* Global structure 를 추출
* 가장 큰 단계 (N=0) 에서는 이미지의 일부영역만을 커버
* Fine detail 추출
* N 단계의 generator에는 그 전단계의 모든 generator가 사용됨
* N+1단계의 generator에서 얻어진 output을 scale factor만큼 upscale하여 입력으로 사용
* N 단계의 generator를 학습시킨 후 고정시키고 N-1단계의 generator를 학습시키는 방식
* 모든 generator 및 모든 discriminator들은 같은 구조를 가지며 따로 학습 됨
* N단계의 generator는 N+1단계의 파라미터로 초기화
### 2. Network architecture
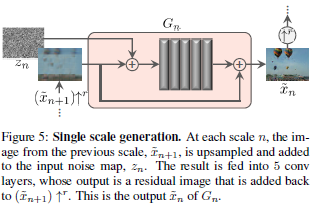
* Convolution Layer 5번 반복
* 각 layer는 Conv(3 x 3) - BatchNorm - LeakyReLU 구조
* (단일 배치로 학습하는데 BatchNorm 사용하는것이 이상하여 구현시에는 InstanceNorm 사용)
* 필터 사이즈는 32로 시작하여 4단계마다 두배씩 늘림
* 입력에는 N+1단계에서 생성된 이미지와 동일사이즈의 노이즈를 더하여 입력
* 출력과 N+1단계에서 생성된 이미지를 더함
* Discriminator는 같은 구조의 Convolution layer들만 사용
* Noise, skip connection 사용안함
* PatchGAN처럼 결과를 평균내어 사용
* 첫 단계 (N=8) 에서는 노이즈만 사용. 입력이미지를 0으로 만들어 사용하는것으로 생각가능
### 3. Training


* Loss fuction
* adversarial loss 와 reconstruction loss 사용
* 계수는 10~100
* reconstruction loss 구할때는 random noise 대신에 처음(N=8)에는 고정된 noise z_fixed를 이후에는 0값을 사용
* input noise를 reconstruction loss에 비례하게끔 설정
* Optimization
* WGAN-gp 사용, gp계수 0.1 사용
* scale당 2000itr, itr당 D 3번 G 3번씩 학습
* 학습률 0.0005사용, 1600itr때 0.1배
* Boundary conditions and the effect of padding
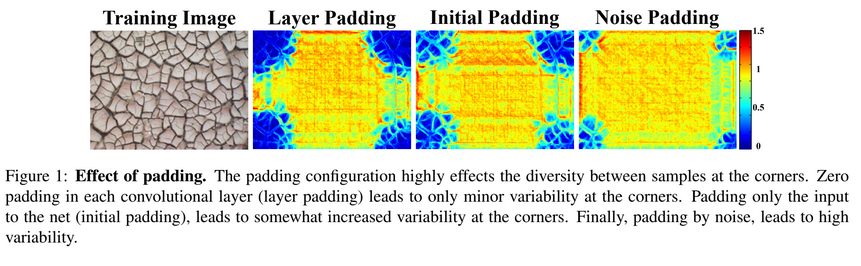
* 처음에 recpetive size //2 만큼 패딩을 주고 conv layer에서는 패딩을 사용하지 않음
* Random patch로 쪼개지 않고 단일 배치로 이미지 전체에 대하여 계산 후 평균내어 학습
## Result
### 1. Random generation
### 2. Effect of scales at test time

* N > n 인 단계에서는 random noise 대신 fixed z와 reconstructed sample 사용
* 더 높은 스케일에서 시작할수록 fine detail만이 재생성 됨
### 3. Effect of scales during trainig

* 더 적은 단계 (scale factor는 고정 -> 이미지가 축소되는 정도가 적음 -> 가장 작은 단계에서 receptive field가 커버하는 영역이 더 작음) 로 분할할 수록 fine detail만을 재수정
### 4. Evaluation
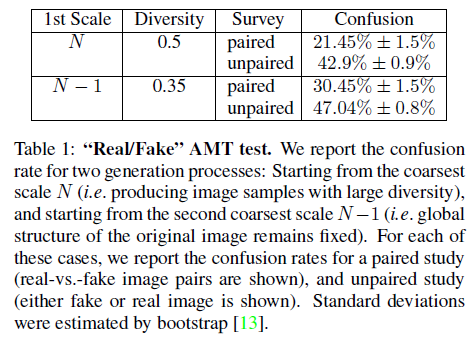
* #### "Real/Fake" AMT test
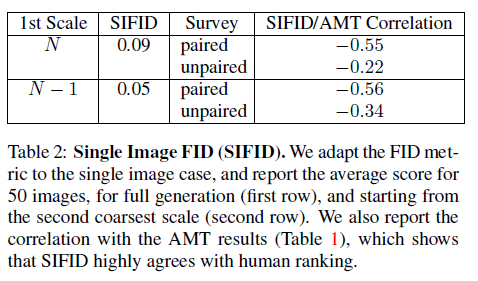
* #### Single image Frechet inception distance
## Application
### 1. Super-resolution
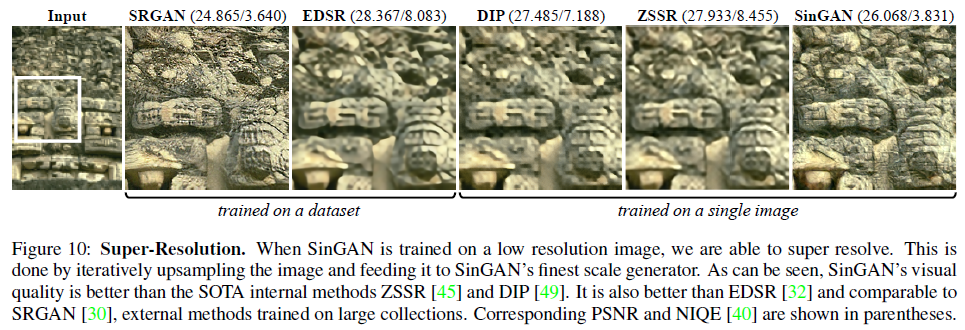
* G0에서 (target scale factor)^(1/num repeat) 만큼씩 점진적으로 upscale
* 논문에선 random noise를 사용하는것으로 적혀있으나 reconstructed sample을 만들때처럼 0값을 사용하는것이 더 안정적인듯함
* reconstruction loss 계수는 100사용
### 2. Paint-to-image

* N-2나 N-1 정도의 coarse scale단계에서 generated sample 대신 segment mask를 주입
* random noise 사용
### 3. Harmonization
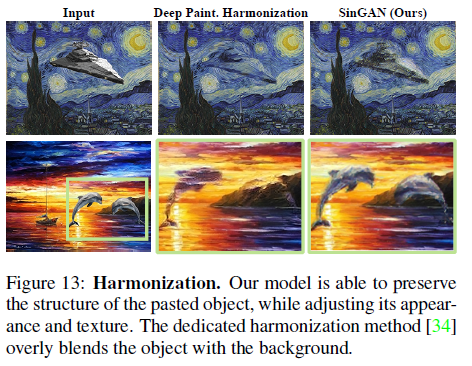
* 1~3 정도의 fine scale단계에서 generated sample 대신 overlapped image를 주입
* random noise 사용
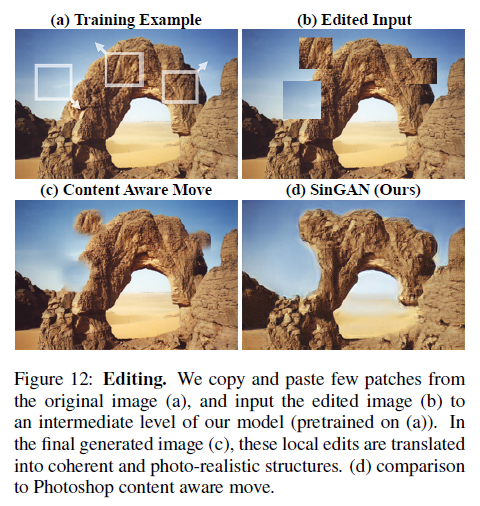
### 4. Editing
## Implementation