# ngx-planet
**Repository Path**: mirrors_worktile/ngx-planet
## Basic Information
- **Project Name**: ngx-planet
- **Description**: 🚀🌍🚀A powerful, reliable, fully-featured and production ready Micro Frontend library for Angular.
- **Primary Language**: Unknown
- **License**: MIT
- **Default Branch**: master
- **Homepage**: None
- **GVP Project**: No
## Statistics
- **Stars**: 3
- **Forks**: 1
- **Created**: 2022-01-06
- **Last Updated**: 2026-06-21
## Categories & Tags
**Categories**: Uncategorized
**Tags**: None
## README
# ngx-planet
[](https://circleci.com/gh/worktile/ngx-planet)
[![Coverage Status][coveralls-image]][coveralls-url]
[](https://www.npmjs.com/package/@worktile/planet)
[](https://www.npmjs.com/package/@worktile/planet)
 [](#contributors-)
[coveralls-image]: https://coveralls.io/repos/github/worktile/ngx-planet/badge.svg?branch=master
[coveralls-url]: https://coveralls.io/github/worktile/ngx-planet
一个强大、可靠、完善、完全可用于生产环境的 Angular 微前端库。
Angular 的 API 风格,目前只支持 Angular 框架,不支持其他 MV* 前端框架。
中文文档 | [English README](https://github.com/worktile/ngx-planet/blob/master/README.md)
## ✨ 功能
- 支持同时渲染多个子应用
- 支持并存(coexist)和默认(default)两种模式, 默认模式切换其他子应用销毁当前子应用,并存模式不会销毁,而是隐藏
- 支持子应用的预加载
- 支持样式隔离
- 内置多个应用之间的通信
- 支持跨应用组件的渲染
- 完善的示例,包含路由配置、懒加载等所有功能
## 📖 Documentation
- [介绍](http://planet.ngnice.com/guides/intro)
- [快速开始](http://planet.ngnice.com/guides/getting-started)
- [开发与构建](http://planet.ngnice.com/guides/dev-build)
- [数据共享与通信](http://planet.ngnice.com/guides/communication)
- [跨应用渲染](http://planet.ngnice.com/guides/cross-app-comp-rendering)
- [API 引用](http://planet.ngnice.com/guides/api)
## 其他方案
- [single-spa](https://github.com/CanopyTax/single-spa): A javascript front-end framework supports any frameworks.
- [mooa](https://github.com/phodal/mooa): A independent-deployment micro-frontend Framework for Angular from single-spa, `planet` 和 `mooa` 非常相似, 但是 `planet` 更加强大、可靠,同时完全用于了生产环境,比如:https://pingcode.com
## 安装
```bash
$ npm i @worktile/planet --save
// 或者
$ yarn add @worktile/planet
```
## 示例
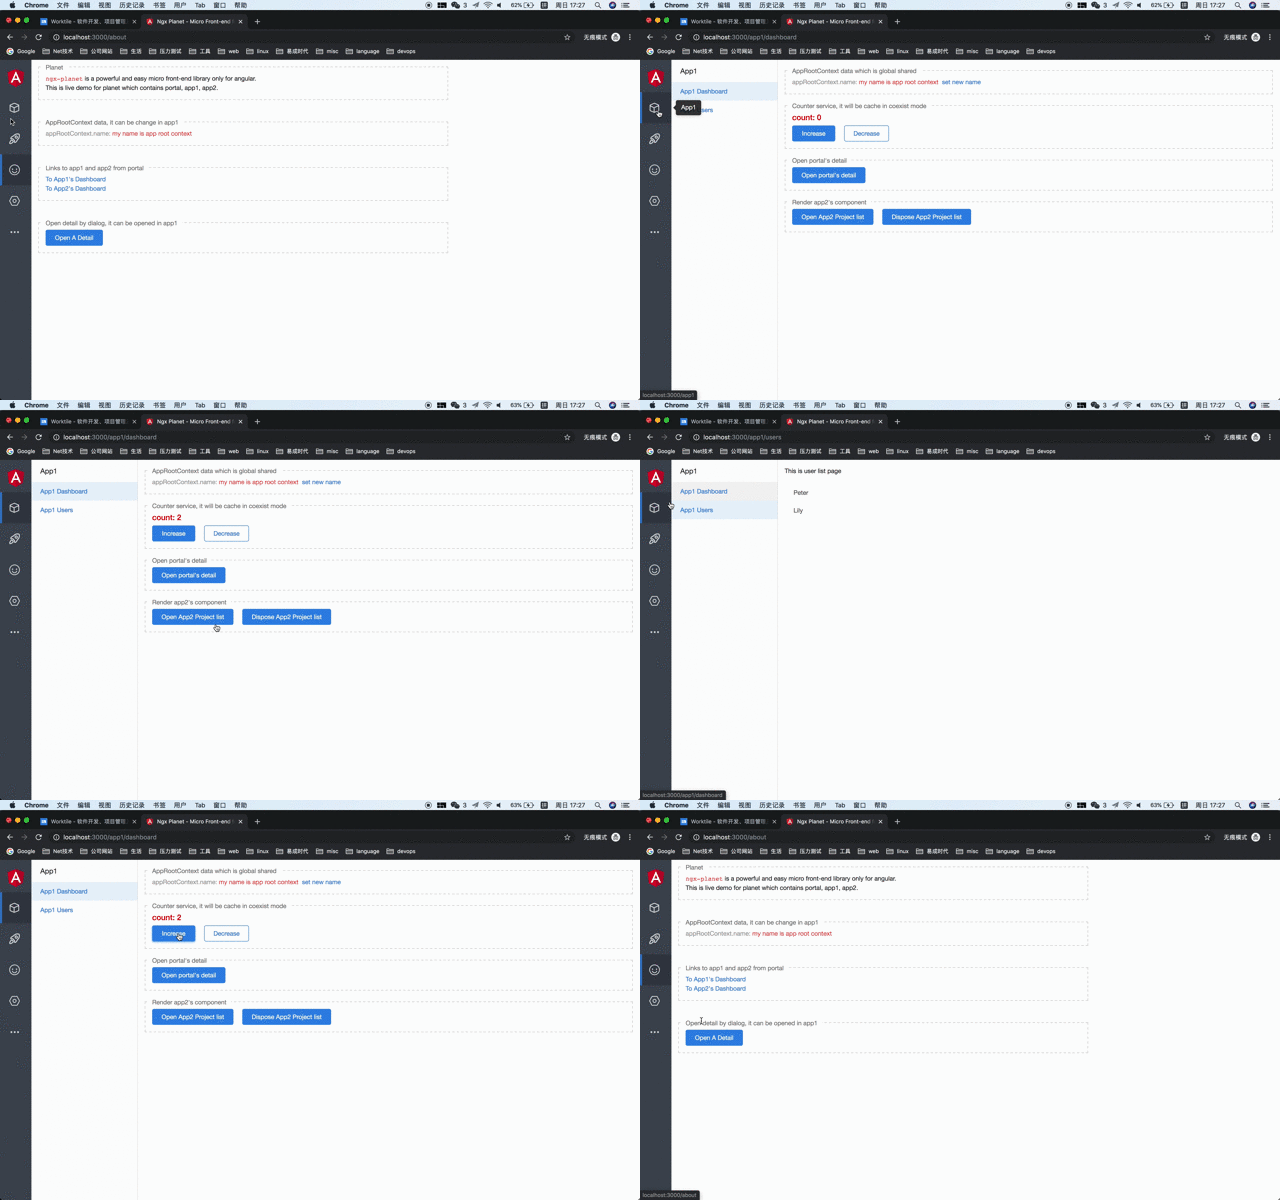
[Try out our live demo](http://planet-examples.ngnice.com)
## 使用说明
### 1. 在主应用的`AppModule`中引入`NgxPlanetModule`
```
import { NgxPlanetModule } from '@worktile/planet';
@NgModule({
imports: [
CommonModule,
NgxPlanetModule
]
})
class AppModule {}
```
### 2. 通过`Planet`服务在主应用中注册子应用
```ts
@Component({
selector: 'app-portal-root',
template: `
加载中...
`
})
export class AppComponent implements OnInit {
title = 'ngx-planet';
get loadingDone() {
return this.planet.loadingDone;
}
constructor(
private planet: Planet
) {}
ngOnInit() {
this.planet.setOptions({
switchMode: SwitchModes.coexist,
errorHandler: error => {
console.error(`Failed to load resource, error:`, error);
}
});
this.planet.registerApps([
{
name: 'app1',
hostParent: '#app-host-container',
hostClass: 'thy-layout',
routerPathPrefix: '/app1',
resourcePathPrefix: '/static/app1',
preload: true,
scripts: [
'main.js'
],
styles: [
'styles.css'
]
},
{
name: 'app2',
hostParent: '#app-host-container',
hostClass: 'thy-layout',
routerPathPrefix: '/app2',
preload: true,
scripts: [
'/static/app2/main.js'
],
styles: [
'/static/app2/styles.css'
]
}
]);
// start monitor route changes
// get apps to active by current path
// load static resources which contains javascript and css
// bootstrap angular sub app module and show it
this.planet.start();
}
}
```
### 3. 子应用通过`defineApplication`定义如何启动子应用, 同时可以设置`PlanetPortalApplication`服务为主应用的全局服务。
启动模块应用(>= 17.0.0):
```ts
defineApplication('app1', {
template: ``,
bootstrap: (portalApp: PlanetPortalApplication) => {
return platformBrowserDynamic([
{
provide: PlanetPortalApplication,
useValue: portalApp
},
{
provide: AppRootContext,
useValue: portalApp.data.appRootContext
}
])
.bootstrapModule(AppModule)
.then(appModule => {
return appModule;
})
.catch(error => {
console.error(error);
return null;
});
}
});
```
启动独立应用:
```ts
defineApplication('standalone-app', {
template: ``,
bootstrap: (portalApp: PlanetPortalApplication) => {
return bootstrapApplication(AppRootComponent, {
providers: [
{
provide: PlanetPortalApplication,
useValue: portalApp
},
{
provide: AppRootContext,
useValue: portalApp.data.appRootContext
}
]
}).catch(error => {
console.error(error);
return null;
});
}
});
```
## 文档
### 子应用
| Name | Type | Description | 中文描述 |
| ------------------ | --------------------- | ------------------------------------------------------------------------------ | ----------------------------------------------------------------------------------------------------------------------------------------------------------------------- |
| name | string | Application's name | 子应用的名字 |
| routerPathPrefix | string | Application route path prefix | 子应用路由路径前缀,根据这个匹配应用 |
| selector | string | selector of app root component | 子应用的启动组件选择器,因为子应用是主应用动态加载的,所以主应用需要先创建这个选择器节点,再启动 AppModule |
| scripts | string[] | javascript static resource paths | JS 静态资源文件访问地址 |
| styles | string[] | style static resource paths | 样式静态资源文件访问地址 |
| resourcePathPrefix | string | path prefix of scripts and styles | 脚本和样式文件路径前缀,多个脚本可以避免重复写同样的前缀 |
| hostParent | string or HTMLElement | parent element for render | 应用渲染的容器元素, 指定子应用显示在哪个元素内部 |
| hostClass | string | added class for host which is selector | 宿主元素的 Class,也就是在子应用启动组件上追加的样式 |
| switchMode | default or coexist | it will be destroyed when set to default, it only hide app when set to coexist | 切换子应用的模式,默认切换会销毁,设置 coexist 后只会隐藏 |
| preload | boolean | start preload or not | 是否启用预加载,启动后刷新页面等当前页面的应用渲染完毕后预加载子应用 |
| loadSerial | boolean | serial load scripts | 是否串行加载脚本静态资源 |
| manifest | string | manifest json file path | manifest.json 文件路径地址,当设置了路径后会先加载这个文件,然后根据 scripts 和 styles 文件名去找到匹配的文件,因为生产环境的静态资文件是 hash 之后的命名,需要动态获取 |
### `GlobalEventDispatcher` 实现应用之间的通信
```
import { GlobalEventDispatcher } from "@worktile/planet";
// app1 root module
export class AppModule {
constructor(private globalEventDispatcher: GlobalEventDispatcher) {
this.globalEventDispatcher.register('open-a-detail').subscribe(event => {
// dialog.open(App1DetailComponent);
});
}
}
// in other apps
export class OneComponent {
constructor(private globalEventDispatcher: GlobalEventDispatcher) {
}
openDetail() {
this.globalEventDispatcher.dispatch('open-a-detail', payload);
}
}
```
### 跨应用组件渲染
```
import { PlanetComponentLoader } from "@worktile/planet";
// in app1
export class AppModule {
constructor(private planetComponentLoader: PlanetComponentLoader) {
this.planetComponentLoader.register([App1ProjectListComponent]);
}
}
```
通过 `PlanetComponentOutlet` 传入 `app1` 组件的选择器 `app1-project-list` 渲染组件,
```html
// or
```
通过`PlanetComponentLoader`渲染`app1`的`app1-project-list`组件,记得要`dispose`销毁。
```ts
@Component({
...
})
export class OneComponent {
private componentRef: PlanetComponentRef;
constructor(private planetComponentLoader: PlanetComponentLoader) {
}
openDetail() {
this.planetComponentLoader.load('app1', 'app1-project-list', {
container: this.containerElementRef,
initialState: {}
}).subscribe((componentRef) => {
this.componentRef = componentRef;
});
}
ngOnDestroy() {
this.componentRef?.dispose();
}
}
```
## FAQ
### 无限循环加载主应用的js
因为主应用和子应用都是通过Webpack打包的,打包的版本依赖会有冲突,需要通过`@angular-builders/custom-webpack`插件设置扩展的`Webpack`配置`runtimeChunk`, 期望 Webpack 5 对于微前端支持的更好。
```
// extra-webpack.config.js
{
optimization: {
runtimeChunk: false
}
};
```
### 报错 `Cannot read property 'call' of undefined at __webpack_require__ (bootstrap:79)`
和上面的原因类似,我们需要设置 `vendorChunk` 为 `false`,需要同时设置 `angular.json`中的`build`和`serve`, `serve` 按理说是应该继承 build 的配置的,好像在 Angular 8 中有缺陷,不起作用。
```
...
"build": {
"builder": "@angular-builders/custom-webpack:browser",
"options": {
"customWebpackConfig": {
"path": "./examples/app2/extra-webpack.config.js",
"mergeStrategies": {
"module.rules": "prepend"
},
"replaceDuplicatePlugins": true
},
...
"vendorChunk": false,
...
},
},
"serve": {
"builder": "@angular-builders/custom-webpack:dev-server",
"options": {
...
"vendorChunk": false
...
}
}
...
```
### 报错 `An accessor cannot be declared in an ambient context.`
这好像是 TypeScript 某个版本的缺陷,详细情况可以查看 see [an-accessor-cannot-be-declared](https://stackoverflow.com/questions/61248058/error-ngx-daterangepicker-material-an-accessor-cannot-be-declared-in-an-ambient
)
临时解决通过设置 `skipLibCheck` 为 true,将来升级到高级版本的 TypeScript 可能就自动修复了。
```
"compilerOptions": {
"skipLibCheck": true
}
```
### 使用路由延迟加载生产环境报错 `Cannot read property 'call' of undefined``
在 Webpack 4 中,多个应用的运行时在同一个页面下会有冲突,因为它们使用了相同的全局变量加载 chunk,为了修复这个问题,你需要通过`output.jsonpFunction`配置项提供一个自定义的名字,详细信息参考:[Automatic unique naming](https://webpack.js.org/blog/2020-10-10-webpack-5-release/#automatic-unique-naming).
你需要给每一个子应用的 `extra-webpack.config.js` 文件中配置一个唯一的名字
```
output: { jsonpFunction: "app1" }
```
## 开发
```
npm run start // open http://localhost:3000
or
npm run serve:portal // 3000
npm run serve:app1 // 3001
npm run serve:app2 // 3002
// test
npm run test
```