# chatbot
**Repository Path**: lunny_li/chatbot
## Basic Information
- **Project Name**: chatbot
- **Description**: No description available
- **Primary Language**: Go
- **License**: GPL-3.0
- **Default Branch**: master
- **Homepage**: None
- **GVP Project**: No
## Statistics
- **Stars**: 0
- **Forks**: 0
- **Created**: 2025-02-11
- **Last Updated**: 2025-02-11
## Categories & Tags
**Categories**: Uncategorized
**Tags**: None
## README

飞书 ×(GPT)+ 打字机效果
🚀 Feishu OpenAI 🚀
| AI
| ![]() SDK
SDK ![]() | Application |
| :-------------------------------: | :----------------------------------------------------------: | :----------------------------------------------------------: |
| 🎒OpenAI | [Go-OpenAI](https://github.com/ConnectAI-E/Go-OpenAI) | [🏅Feishu-OpenAI](https://github.com/ConnectAI-E/Feishu-OpenAI), [🎖Lark-OpenAI](https://github.com/ConnectAI-E/Lark-OpenAI), [Feishu-EX-ChatGPT](https://github.com/ConnectAI-E/Feishu-EX-ChatGPT), [🎖Feishu-OpenAI-Stream-Chatbot](https://github.com/ConnectAI-E/Feishu-OpenAI-Stream-Chatbot), [Feishu-TLDR](https://github.com/ConnectAI-E/Feishu-TLDR),[Feishu-OpenAI-Amazing](https://github.com/ConnectAI-E/Feishu-OpenAI-Amazing), [Feishu-Oral-Friend](https://github.com/ConnectAI-E/Feishu-Oral-Friend), [Feishu-OpenAI-Base-Helper](https://github.com/ConnectAI-E/Feishu-OpenAI-Base-Helper), [Feishu-Vector-Knowledge-Management](https://github.com/ConnectAI-E/Feishu-Vector-Knowledge-Management), [Feishu-OpenAI-PDF-Helper](https://github.com/ConnectAI-E/Feishu-OpenAI-PDF-Helper), [🏅Dingtalk-OpenAI](https://github.com/ConnectAI-E/Dingtalk-OpenAI), [Wework-OpenAI](https://github.com/ConnectAI-E/Wework-OpenAI), [WeWork-OpenAI-Node](https://github.com/ConnectAI-E/WeWork-OpenAI-Node), [llmplugin](https://github.com/ConnectAI-E/llmplugin) |
| 🤖 AutoGPT | ------ | [🏅AutoGPT-Next-Web](https://github.com/ConnectAI-E/AutoGPT-Next-Web) |
| 🎭 Stablediffusion | ------ | [🎖Feishu-Stablediffusion](https://github.com/ConnectAI-E/Feishu-Stablediffusion) |
| 🍎 Midjourney | [Go-Midjourney](https://github.com/ConnectAI-E/Go-Midjourney) | [🏅Feishu-Midjourney](https://github.com/ConnectAI-E/Feishu-Midjourney), [🔥MidJourney-Web](https://github.com/ConnectAI-E/MidJourney-Web), [Dingtalk-Midjourney](https://github.com/ConnectAI-E/Dingtalk-Midjourney) |
| 🍍 文心一言 | [Go-Wenxin](https://github.com/ConnectAI-E/Go-Wenxin) | [Feishu-Wenxin](https://github.com/ConnectAI-E/Feishu-Wenxin), [Dingtalk-Wenxin](https://github.com/ConnectAI-E/Dingtalk-Wenxin), [Wework-Wenxin](https://github.com/ConnectAI-E/Wework-Wenxin) |
| 💸 Minimax | [Go-Minimax](https://github.com/ConnectAI-E/Go-Minimax) | [Feishu-Minimax](https://github.com/ConnectAI-E/Feishu-Minimax), [Dingtalk-Minimax](https://github.com/ConnectAI-E/Dingtalk-Minimax), [Wework-Minimax](https://github.com/ConnectAI-E/Wework-Minimax) |
| ⛳️ CLAUDE | [Go-Claude](https://github.com/ConnectAI-E/Go-Claude) | [Feishu-Claude](https://github.com/ConnectAI-E/Feishu-Claude), [DingTalk-Claude](https://github.com/ConnectAI-E/DingTalk-Claude), [Wework-Claude](https://github.com/ConnectAI-E/Wework-Claude) |
| 🥁 PaLM | [Go-PaLM](https://github.com/ConnectAI-E/go-PaLM) | [Feishu-PaLM](https://github.com/ConnectAI-E/Feishu-PaLM),[DingTalk-PaLM](https://github.com/ConnectAI-E/DingTalk-PaLM),[Wework-PaLM](https://github.com/ConnectAI-E/Wework-PaLM) |
| 🎡 Prompt | ------ | [📖 Prompt-Engineering-Tutior](https://github.com/ConnectAI-E/Prompt-Engineering-Tutior) |
| 🍋 ChatGLM | ------ | [Feishu-ChatGLM](https://github.com/ConnectAI-E/Feishu-ChatGLM) |
| ⛓ LangChain | ------ | [📖 LangChain-Tutior](https://github.com/ConnectAI-E/LangChain-Tutior) |
| 🪄 One-click | ------ | [🎖Awesome-One-Click-Deployment](https://github.com/ConnectAI-E/Awesome-One-Click-Deployment) |
## 👻 机器人功能
🥖 流式文本输出: 仿真打字机效果,更真实的对话体验
💬 多话题对话:支持私人和群聊多话题讨论,高效连贯
🛖 场景预设:内置丰富场景列表,一键切换AI角色
🎭 角色扮演:支持场景模式,增添讨论乐趣和创意
🔄 上下文保留:回复对话框即可继续同一话题讨论
⏰ 自动结束:超时自动结束对话,支持清除讨论历史
📝 富文本卡片:支持富文本卡片回复,信息更丰富多彩
## TODO
- [ ] 与[Feishu-ChatBot](https://github.com/ConnectAI-E/Feishu-OpenAI)进行整合,进一步完善chatbot能力
- [ ] 🔙 历史回档: 轻松回档历史对话,继续话题讨论
- [ ] 🎥 话题内容秒转PPT:让你的汇报从此变得更加简单
- [ ] prompt优化:深化场景细分,让chatbot成为你的个人专属助理
- [ ] 群聊summary:新人加群后可让机器人自动分析并总结群内历史消息
- [ ] 群聊活跃状态:机器人活跃状态可控,而不需要每句话都艾特它
- [ ] 其他欢迎补充
## 项目部署
###### 有关飞书的配置文件说明,**[➡︎ 点击查看](#详细配置步骤)**
| Application |
| :-------------------------------: | :----------------------------------------------------------: | :----------------------------------------------------------: |
| 🎒OpenAI | [Go-OpenAI](https://github.com/ConnectAI-E/Go-OpenAI) | [🏅Feishu-OpenAI](https://github.com/ConnectAI-E/Feishu-OpenAI), [🎖Lark-OpenAI](https://github.com/ConnectAI-E/Lark-OpenAI), [Feishu-EX-ChatGPT](https://github.com/ConnectAI-E/Feishu-EX-ChatGPT), [🎖Feishu-OpenAI-Stream-Chatbot](https://github.com/ConnectAI-E/Feishu-OpenAI-Stream-Chatbot), [Feishu-TLDR](https://github.com/ConnectAI-E/Feishu-TLDR),[Feishu-OpenAI-Amazing](https://github.com/ConnectAI-E/Feishu-OpenAI-Amazing), [Feishu-Oral-Friend](https://github.com/ConnectAI-E/Feishu-Oral-Friend), [Feishu-OpenAI-Base-Helper](https://github.com/ConnectAI-E/Feishu-OpenAI-Base-Helper), [Feishu-Vector-Knowledge-Management](https://github.com/ConnectAI-E/Feishu-Vector-Knowledge-Management), [Feishu-OpenAI-PDF-Helper](https://github.com/ConnectAI-E/Feishu-OpenAI-PDF-Helper), [🏅Dingtalk-OpenAI](https://github.com/ConnectAI-E/Dingtalk-OpenAI), [Wework-OpenAI](https://github.com/ConnectAI-E/Wework-OpenAI), [WeWork-OpenAI-Node](https://github.com/ConnectAI-E/WeWork-OpenAI-Node), [llmplugin](https://github.com/ConnectAI-E/llmplugin) |
| 🤖 AutoGPT | ------ | [🏅AutoGPT-Next-Web](https://github.com/ConnectAI-E/AutoGPT-Next-Web) |
| 🎭 Stablediffusion | ------ | [🎖Feishu-Stablediffusion](https://github.com/ConnectAI-E/Feishu-Stablediffusion) |
| 🍎 Midjourney | [Go-Midjourney](https://github.com/ConnectAI-E/Go-Midjourney) | [🏅Feishu-Midjourney](https://github.com/ConnectAI-E/Feishu-Midjourney), [🔥MidJourney-Web](https://github.com/ConnectAI-E/MidJourney-Web), [Dingtalk-Midjourney](https://github.com/ConnectAI-E/Dingtalk-Midjourney) |
| 🍍 文心一言 | [Go-Wenxin](https://github.com/ConnectAI-E/Go-Wenxin) | [Feishu-Wenxin](https://github.com/ConnectAI-E/Feishu-Wenxin), [Dingtalk-Wenxin](https://github.com/ConnectAI-E/Dingtalk-Wenxin), [Wework-Wenxin](https://github.com/ConnectAI-E/Wework-Wenxin) |
| 💸 Minimax | [Go-Minimax](https://github.com/ConnectAI-E/Go-Minimax) | [Feishu-Minimax](https://github.com/ConnectAI-E/Feishu-Minimax), [Dingtalk-Minimax](https://github.com/ConnectAI-E/Dingtalk-Minimax), [Wework-Minimax](https://github.com/ConnectAI-E/Wework-Minimax) |
| ⛳️ CLAUDE | [Go-Claude](https://github.com/ConnectAI-E/Go-Claude) | [Feishu-Claude](https://github.com/ConnectAI-E/Feishu-Claude), [DingTalk-Claude](https://github.com/ConnectAI-E/DingTalk-Claude), [Wework-Claude](https://github.com/ConnectAI-E/Wework-Claude) |
| 🥁 PaLM | [Go-PaLM](https://github.com/ConnectAI-E/go-PaLM) | [Feishu-PaLM](https://github.com/ConnectAI-E/Feishu-PaLM),[DingTalk-PaLM](https://github.com/ConnectAI-E/DingTalk-PaLM),[Wework-PaLM](https://github.com/ConnectAI-E/Wework-PaLM) |
| 🎡 Prompt | ------ | [📖 Prompt-Engineering-Tutior](https://github.com/ConnectAI-E/Prompt-Engineering-Tutior) |
| 🍋 ChatGLM | ------ | [Feishu-ChatGLM](https://github.com/ConnectAI-E/Feishu-ChatGLM) |
| ⛓ LangChain | ------ | [📖 LangChain-Tutior](https://github.com/ConnectAI-E/LangChain-Tutior) |
| 🪄 One-click | ------ | [🎖Awesome-One-Click-Deployment](https://github.com/ConnectAI-E/Awesome-One-Click-Deployment) |
## 👻 机器人功能
🥖 流式文本输出: 仿真打字机效果,更真实的对话体验
💬 多话题对话:支持私人和群聊多话题讨论,高效连贯
🛖 场景预设:内置丰富场景列表,一键切换AI角色
🎭 角色扮演:支持场景模式,增添讨论乐趣和创意
🔄 上下文保留:回复对话框即可继续同一话题讨论
⏰ 自动结束:超时自动结束对话,支持清除讨论历史
📝 富文本卡片:支持富文本卡片回复,信息更丰富多彩
## TODO
- [ ] 与[Feishu-ChatBot](https://github.com/ConnectAI-E/Feishu-OpenAI)进行整合,进一步完善chatbot能力
- [ ] 🔙 历史回档: 轻松回档历史对话,继续话题讨论
- [ ] 🎥 话题内容秒转PPT:让你的汇报从此变得更加简单
- [ ] prompt优化:深化场景细分,让chatbot成为你的个人专属助理
- [ ] 群聊summary:新人加群后可让机器人自动分析并总结群内历史消息
- [ ] 群聊活跃状态:机器人活跃状态可控,而不需要每句话都艾特它
- [ ] 其他欢迎补充
## 项目部署
###### 有关飞书的配置文件说明,**[➡︎ 点击查看](#详细配置步骤)**
本地部署
```bash
git clone https://github.com/ConnectAI-E/Feishu-OpenAI-Stream-Chatbot.git
cd Feishu-OpenAI-Stream-Chatbot/code
```
如果你的服务器没有公网 IP,可以使用反向代理的方式
飞书的服务器在国内对 ngrok 的访问速度很慢,所以推荐使用一些国内的反向代理服务商
- [cpolar](https://dashboard.cpolar.com/)
- [natapp](https://natapp.cn/)
```bash
# 配置config.yaml
mv config.example.yaml config.yaml
//测试部署
go run main.go
cpolar http 9000
//正式部署
nohup cpolar http 9000 -log=stdout &
//查看服务器状态
https://dashboard.cpolar.com/status
// 下线服务
ps -ef | grep cpolar
kill -9 PID
```
更多详细介绍,参考[飞书上的小计算器: Go 机器人来啦](https://www.bilibili.com/video/BV1nW4y1378T/)
serverless云函数(阿里云等)部署
```bash
git clone git@github.com:Leizhenpeng/feishu-chatgpt.git
cd feishu-chatgpt/code
```
安装[severless](https://docs.serverless-devs.com/serverless-devs/quick_start)工具
```bash
# 配置config.yaml
mv config.example.yaml config.yaml
# 安装severless cli
npm install @serverless-devs/s -g
```
安装完成后,请根据您本地环境,根据下面教程部署`severless`
- 本地 `linux`/`mac os` 环境
1. 修改`s.yaml`中的部署地区和部署秘钥
```
edition: 1.0.0
name: feishuBot-chatGpt
access: "aliyun" # 修改自定义的秘钥别称
vars: # 全局变量
region: "cn-hongkong" # 修改云函数想要部署地区
```
2. 一键部署
```bash
cd ..
s deploy
```
- 本地`windows`
1. 首先打开本地`cmd`命令提示符工具,运行`go env`检查你电脑上 go 环境变量设置, 确认以下变量和值
```cmd
set GO111MODULE=on
set GOARCH=amd64
set GOOS=linux
set CGO_ENABLED=0
```
如果值不正确,比如您电脑上为`set GOOS=windows`, 请运行以下命令设置`GOOS`变量值
```cmd
go env -w GOOS=linux
```
2. 修改`s.yaml`中的部署地区和部署秘钥
```
edition: 1.0.0
name: feishuBot-chatGpt
access: "aliyun" # 修改自定义的秘钥别称
vars: # 全局变量
region: "cn-hongkong" # 修改云函数想要部署地区
```
3. 修改`s.yaml`中的`pre-deploy`, 去除第二步`run`前面的环变量改置部分
```
pre-deploy:
- run: go mod tidy
path: ./code
- run: go build -o
target/main main.go # 删除GO111MODULE=on GOOS=linux GOARCH=amd64 CGO_ENABLED=0
path: ./code
```
4. 一键部署
```bash
cd ..
s deploy
```
更多详细介绍,参考[仅需 1min,用 Serverless 部署基于 gin 的飞书机器人](https://www.bilibili.com/video/BV1nW4y1378T/)
使用 Railway 平台一键部署
Railway 是一家国外的 Serverless 平台,支持多种语言,可以一键将 Github 上的代码仓库部署到 Railway 平台,然后在 Railway
平台上配置环境变量即可。部署本项目的流程如下:
#### 1. 生成 Railway 项目
点击下方按钮即可创建一个对应的 Railway 项目,其会自动 Fork 本项目到你的 Github 账号下。
[](https://railway.app/template/c5gX3_?referralCode=oXo6Mc)
#### 2. 配置环境变量
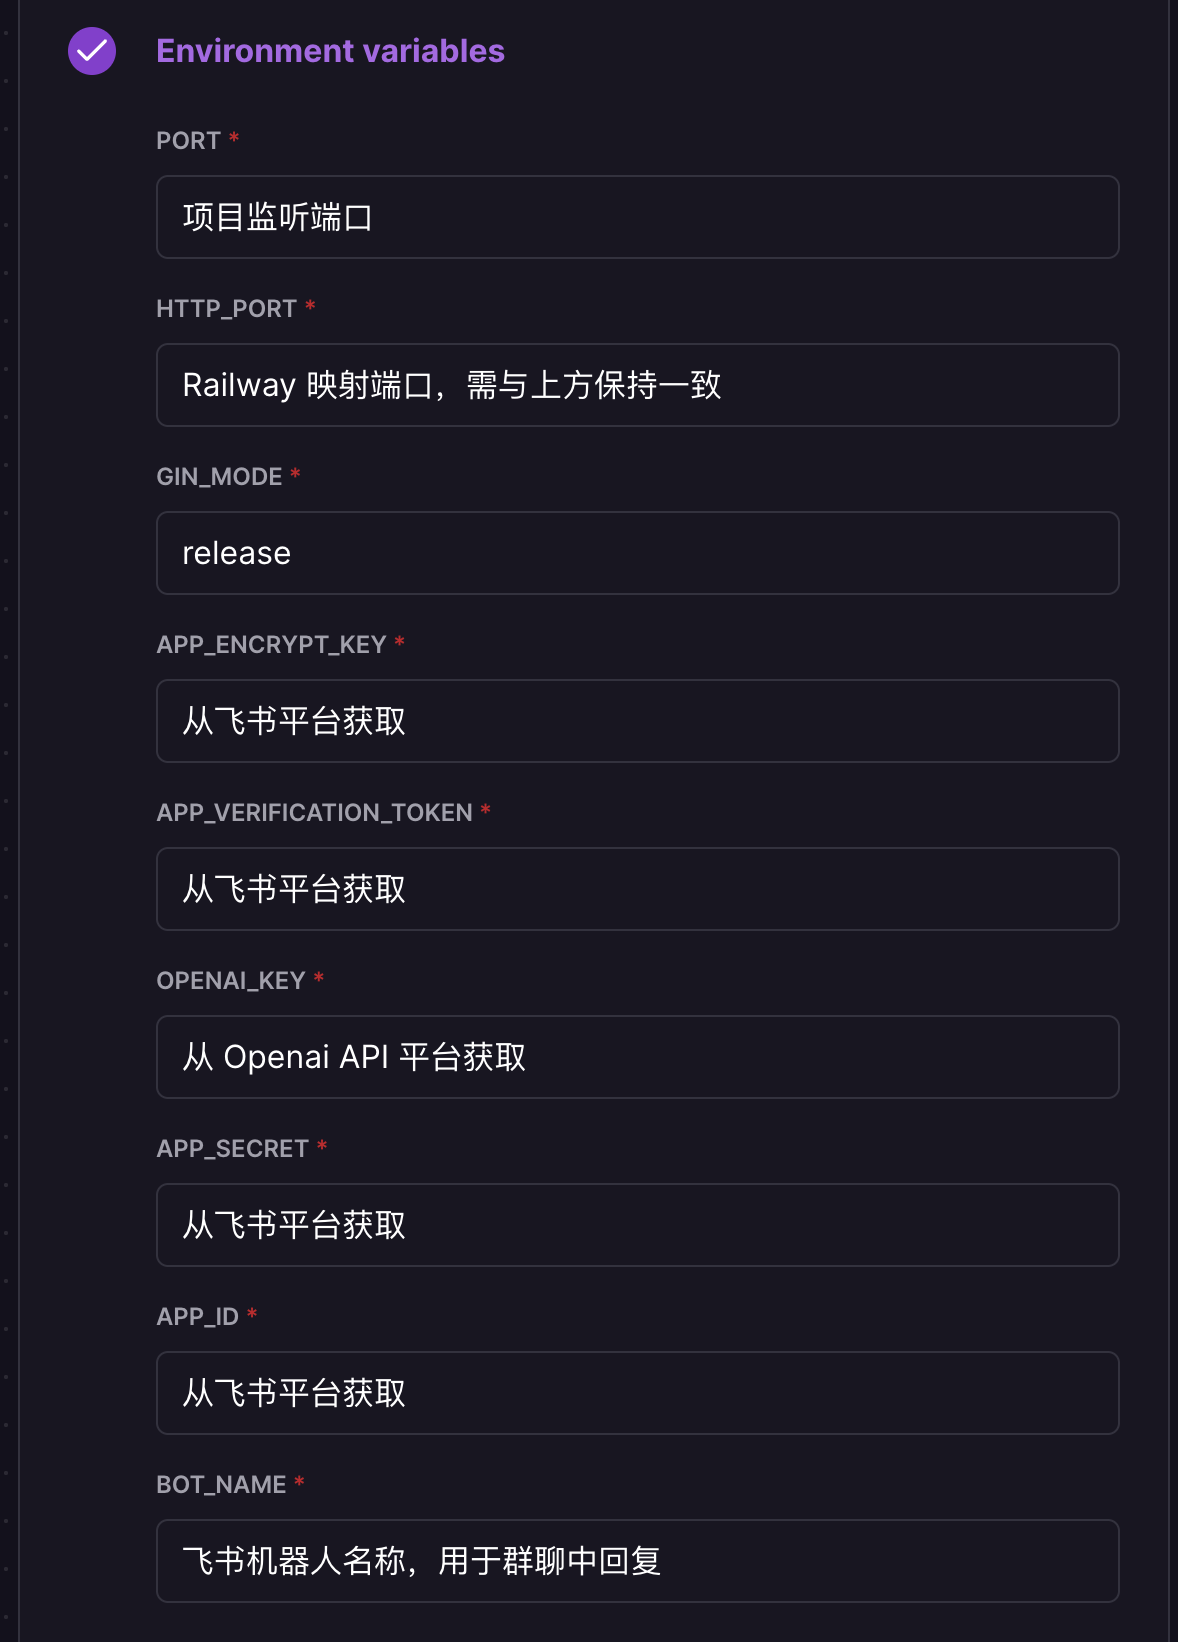
在打开的页面中,配置环境变量,PORT/HTTP_PORT 必须设置为 80 ,railway health check 默认检查 80 端口,不支持自定义端口,每个变量的说明如下图所示:
 #### 3. 部署项目
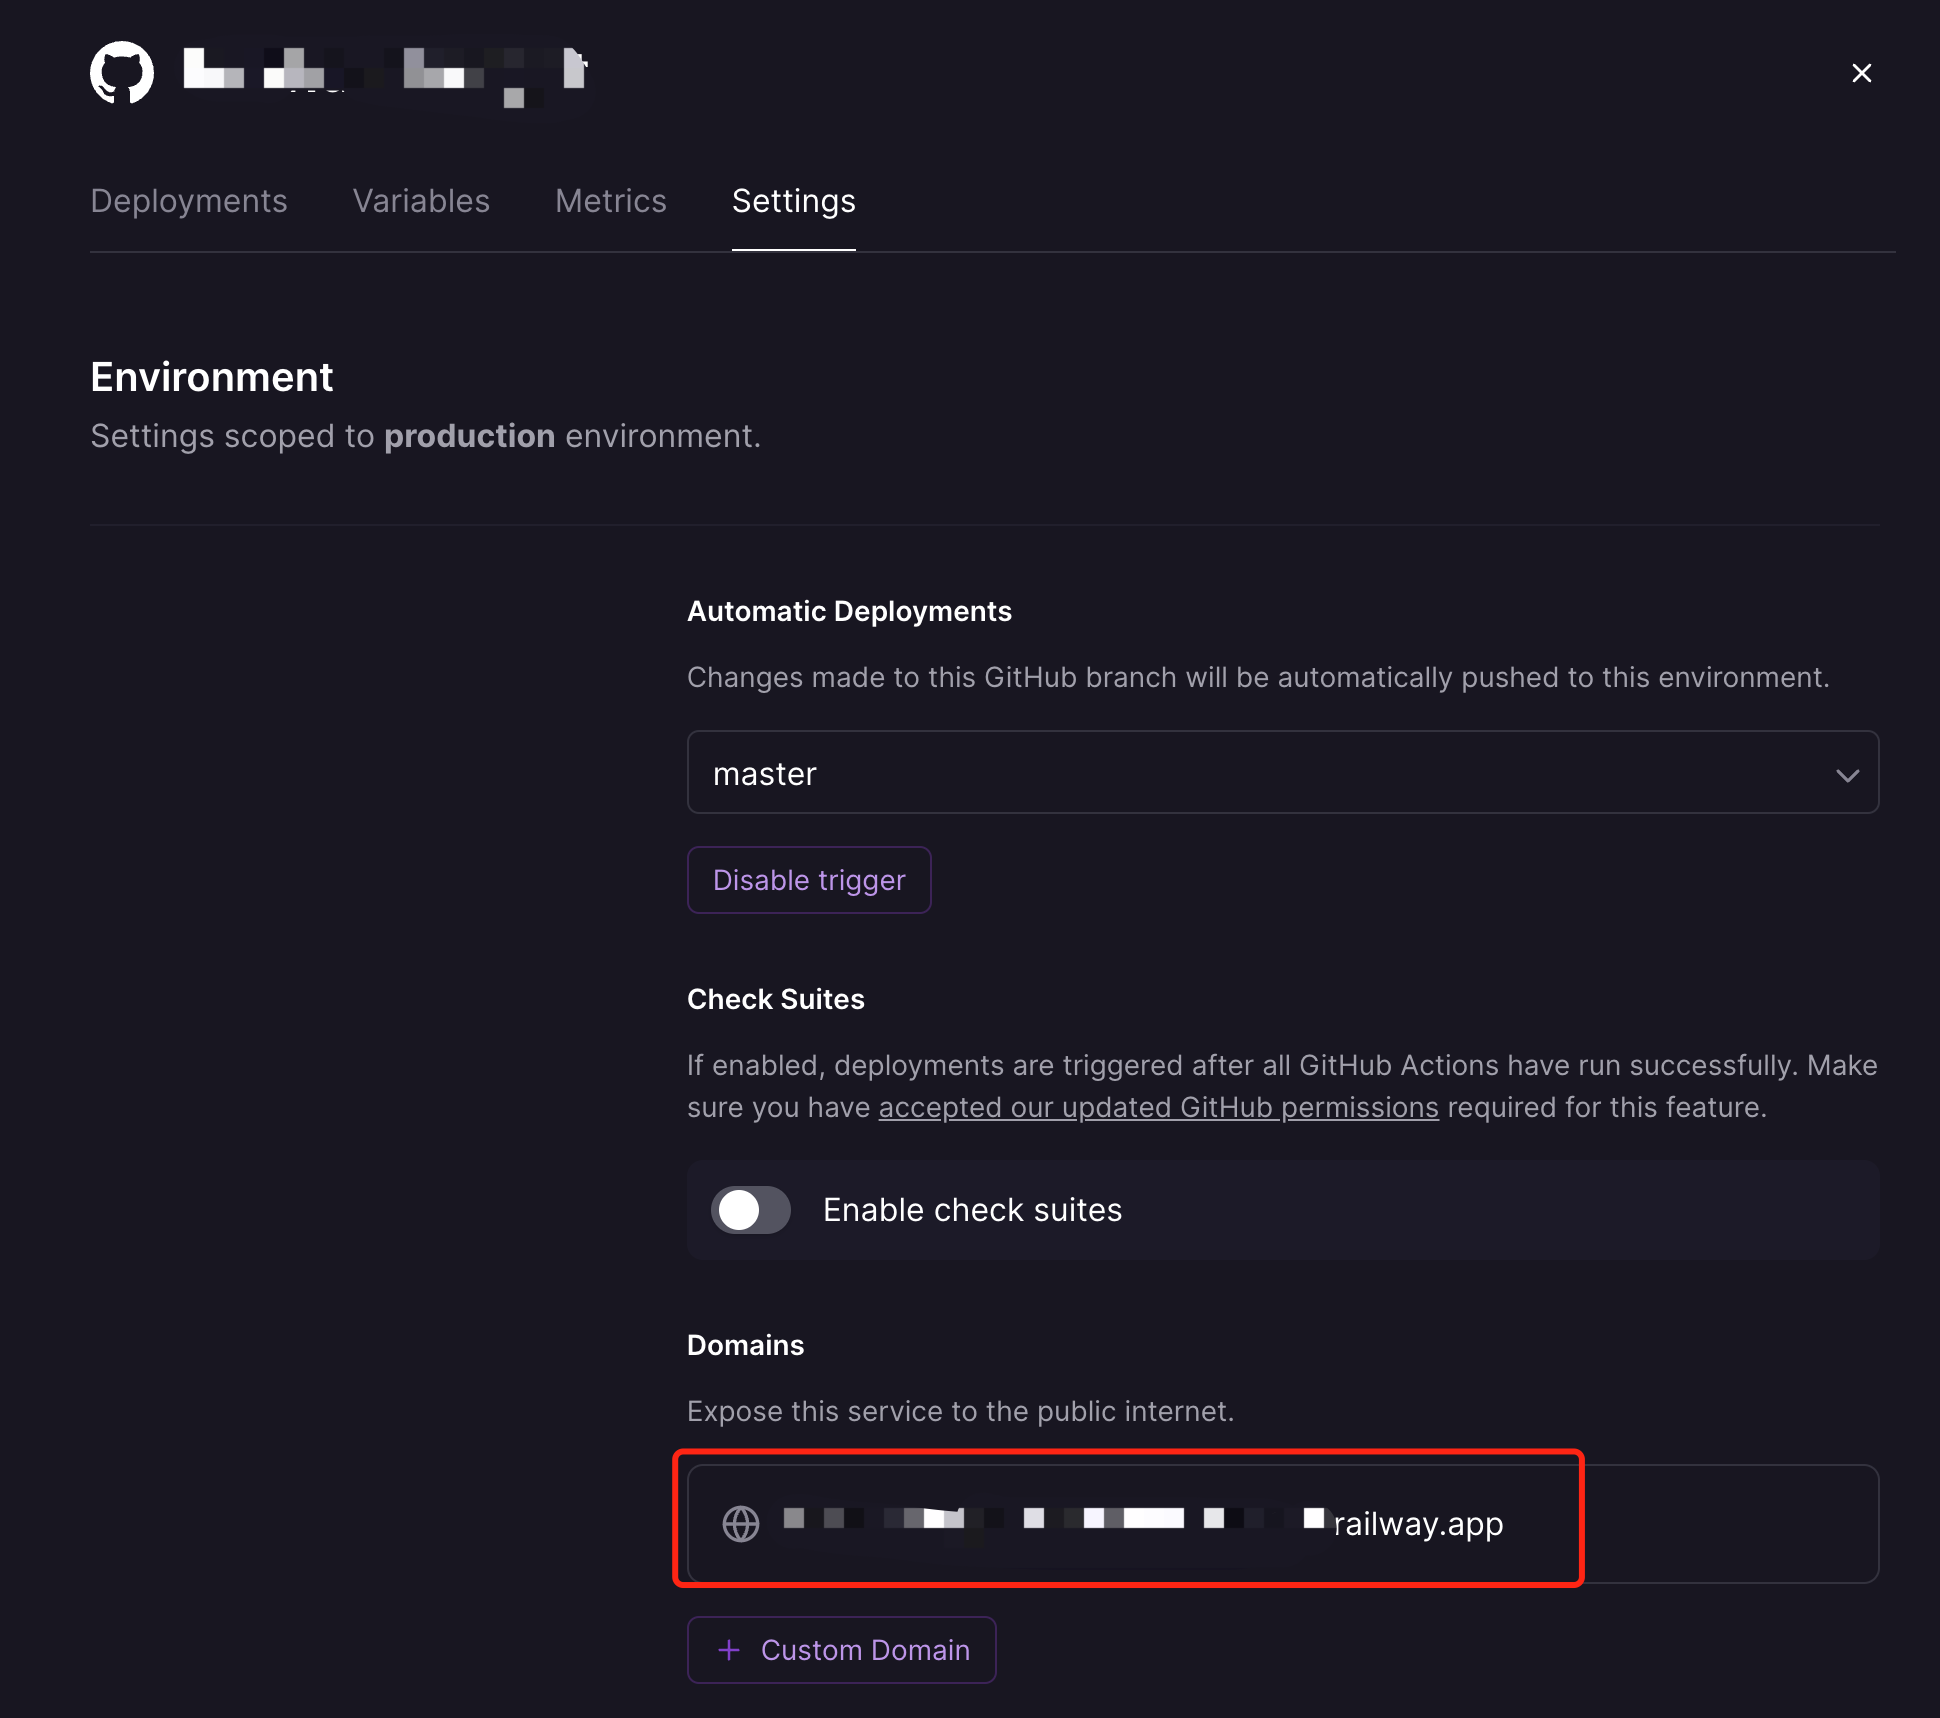
填写完环境变量后,点击 Deploy 就完成了项目的部署。部署完成后还需获取对应的域名用于飞书机器人访问,如下图所示:
#### 3. 部署项目
填写完环境变量后,点击 Deploy 就完成了项目的部署。部署完成后还需获取对应的域名用于飞书机器人访问,如下图所示:
 如果不确定自己部署是否成功,可以通过访问上述获取到的域名 (https://xxxxxxxx.railway.app/ping) 来查看是否返回了`pong`
,如果返回了`pong`,说明部署成功。
如果不确定自己部署是否成功,可以通过访问上述获取到的域名 (https://xxxxxxxx.railway.app/ping) 来查看是否返回了`pong`
,如果返回了`pong`,说明部署成功。
docker部署
```bash
docker build -t feishu-chatgpt:latest .
docker run -d --name feishu-chatgpt -p 9000:9000 \
--env APP_ID=xxx \
--env APP_SECRET=xxx \
--env APP_ENCRYPT_KEY=xxx \
--env APP_VERIFICATION_TOKEN=xxx \
--env BOT_NAME=chatGpt \
--env OPENAI_KEY="sk-xxx1,sk-xxx2,sk-xxx3" \
--env API_URL="https://api.openai.com" \
--env HTTP_PROXY="" \
feishu-chatgpt:latest
```
注意:
- `BOT_NAME` 为飞书机器人名称,例如 `chatGpt`
- `OPENAI_KEY` 为openai key,多个key用逗号分隔,例如 `sk-xxx1,sk-xxx2,sk-xxx3`
- `HTTP_PROXY` 为宿主机的proxy地址,例如 `http://host.docker.internal:7890`,没有代理的话,可以不用设置
- `API_URL` 为openai api 接口地址,例如 `https://api.openai.com`, 没有反向代理的话,可以不用设置
---
docker-compose 部署
编辑 docker-compose.yaml,通过 environment 配置相应环境变量(或者通过 volumes 挂载相应配置文件),然后运行下面的命令即可
```bash
# 构建镜像
docker compose build
# 启动服务
docker compose up -d
# 停止服务
docker compose down
```
事件回调地址: http://IP:9000/webhook/event
卡片回调地址: http://IP:9000/webhook/card
## 详细配置步骤
📸 点击展开飞书机器人配置的分步截图指导


- 获取 [OpenAI](https://platform.openai.com/account/api-keys) 的 KEY( 🙉 下面有免费的 KEY 供大家测试部署 )
- 创建 [飞书](https://open.feishu.cn/) 机器人
1. 前往[开发者平台](https://open.feishu.cn/app?lang=zh-CN)创建应用,并获取到 APPID 和 Secret
2. 前往`应用功能-机器人`, 创建机器人
3. 从 cpolar、serverless 或 Railway 获得公网地址,在飞书机器人后台的 `事件订阅` 板块填写。例如,
- `http://xxxx.r6.cpolar.top`为 cpolar 暴露的公网地址
- `/webhook/event`为统一的应用路由
- 最终的回调地址为 `http://xxxx.r6.cpolar.top/webhook/event`
4. 在飞书机器人后台的 `机器人` 板块,填写消息卡片请求网址。例如,
- `http://xxxx.r6.cpolar.top`为 cpolar 暴露的公网地址
- `/webhook/card`为统一的应用路由
- 最终的消息卡片请求网址为 `http://xxxx.r6.cpolar.top/webhook/card`
5. 在事件订阅板块,搜索三个词`机器人进群`、 `接收消息`、 `消息已读`添加, 并将他们所需权限全部申请开通。
进入权限管理界面,搜索`图片`, 勾选`获取与上传图片或文件资源`。
最终会添加下列回调事件
- im:resource(获取与上传图片或文件资源)
- im:message
- im:message.group_at_msg(获取群组中所有消息)
- im:message.group_at_msg:readonly(接收群聊中@机器人消息事件)
- im:message.p2p_msg(获取用户发给机器人的单聊消息)
- im:message.p2p_msg:readonly(读取用户发给机器人的单聊消息)
- im:message:send_as_bot(获取用户在群组中@机器人的消息)
- im:chat:readonly(获取群组信息)
- im:chat(获取与更新群组信息)
5. 发布版本,等待企业管理员审核通过
更多介绍,参考[飞书上的小计算器: Go 机器人来啦](https://www.bilibili.com/video/BV12M41187rV/)
## 一些附加功能
### 1. 日志功能
可以参考 docker-compose.yml 和 config.example.yaml 里面的配置。要注意需要将 logs 目录映射到外部,这样可以方便查看日志。
记录的日志大概是这样的:
```
2023/05/04 00:00:00 Success request: UserId: XXX , Request: [{user 请问今天是几号?} {assistant 抱歉,作为AI语言模型,我不知道今天是几号。请您查看您的设备上的日期或者问问其他人。}] , Response:
抱歉,作为AI语言模型,我不知道今天是几号。请您查看您的设备上的日期或者问问其他人。
```
这里为了保护用户隐私,没有调用飞书接口,将 UserId 翻译为可读的名字。如果有需要的话,建议单个单个按照 UserId 让飞书管理员查找。
此外,比如可以使用
```
grep "UserId" app.log | wc -l
```
来统计一共问了多少个问题。(可以根据实际需求来进行搜索,比如只搜索 Success request 成功回复的请求。)
### 2. 限流功能
可以参考 docker-compose.yml 和 config.example.yaml 里面的配置。要注意这里没有将访问数据保存在外部,这样是为了先不引入外部依赖,比如 redis 或者 mysql。由于可以控制的时间范围是1天,所以放内存里也没啥大问题。
## 更多交流
如需协助部署,或者其他定制服务,可联系下面的WeChat,支持发票~
遇到问题,可以加入飞书群沟通~
 ## 交朋友 或者 鼓励一下
如果你觉得这个项目对你有帮助,可以请作者买本书~
## 交朋友 或者 鼓励一下
如果你觉得这个项目对你有帮助,可以请作者买本书~
 😚 谢谢你啦 😚
## 赞助感谢
友情感谢 'Find My AI' 提供的部分经费赞助!
😚 谢谢你啦 😚
## 赞助感谢
友情感谢 'Find My AI' 提供的部分经费赞助!